Guide to Verify Risk & Margin for Past Trades Using FxBlue Data

Hello,

When placing a trade, you normally calculate the Lots to Trade based on your desired risk. But when you’re analyzing trades from someone else—or reviewing the results of an algorithmic trading bot—you’ll often want to know the actual risk and margin behind each trade.

To check the margin, you can use the formula shared in the previous post. For the risk, we’ll make a small adjustment.


Verify Risk

We’ll use a modified version of the risk formula. Instead of solving for Lots to Trade, we’ll solve for Risk ($) to verify whether the executed lot size aligns with the intended risk.

Formula:

$$
Risk\ ($) = \frac{ | (Entry\ Price - Stoploss\ Price) | \times Lot\ Size \times Lots\ to\ Trade } {Conversion\ Rate}
$$

Example

Let’s revisit Example #3 from the previous post: a GBPJPY trade where we had to truncate the Lots to Trade value to two decimal places. Using the same details, we can walk through the steps to calculate the actual risk.

  • Lots to Trade: 0.68
  • Desired Risk: $500
  • Entry Price: 198.758
  • Stoploss Price: 199.848
  • Conversion Rate: 150
  • Lot Size: 100,000 GBP
  • Leverage: 100

Step 1. Substitute values into the formula

$$
Risk\ ($) = \frac{ |(198.758 - 199.848)| \times 100,000 \times 0.68 } {150}
$$

Step 2. Simplify the absolute difference

$$
Risk\ ($) = \frac{ 1.09 \times 100,000 \times 0.68 } {150}
$$

Step 3. Multiply

$$
Risk\ ($) = \frac{ 74,120 } {150}
$$

Step 4. Divide – Final Result

$$
Risk\ ($) = 494.13
$$

The actual risk for this trade was $494.13—slightly below the intended $500. This difference is expected, since we rounded the lot size to two decimal places.


Spreadsheet Analysis

Now that the math is clear, let’s see how to automate this process by analyzing FxBlue track record data in a spreadsheet. For this example, we’ll use Google Sheets, though you could also work in Excel if you prefer.

Step 1. Download the Necessary Files

  1. Download the prebuilt spreadsheet:
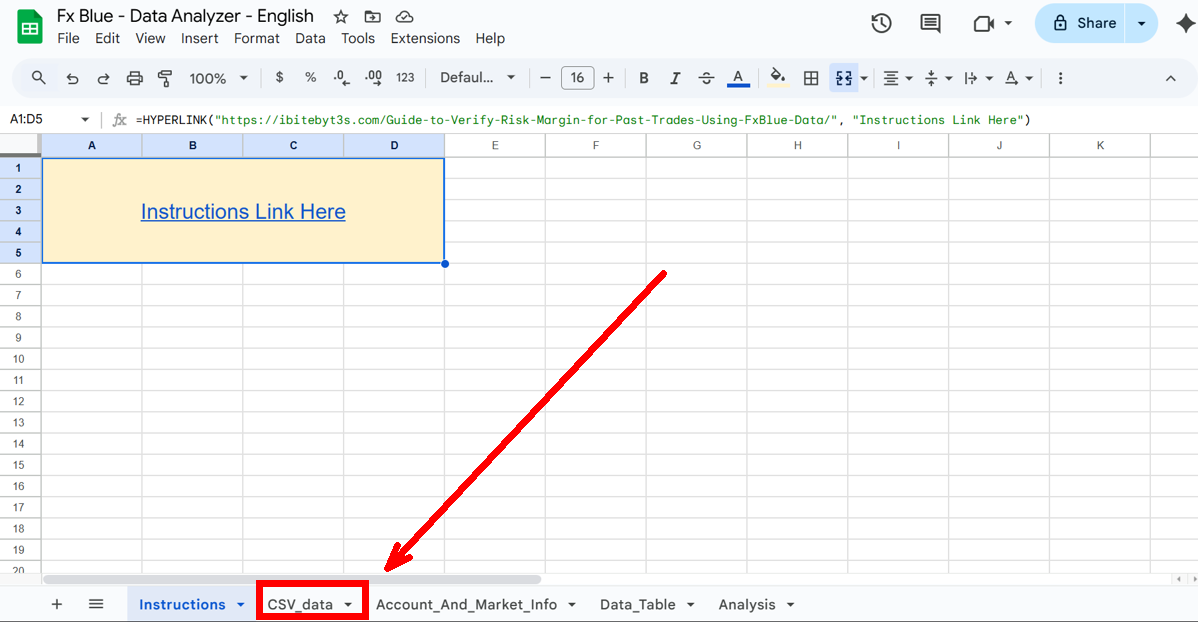
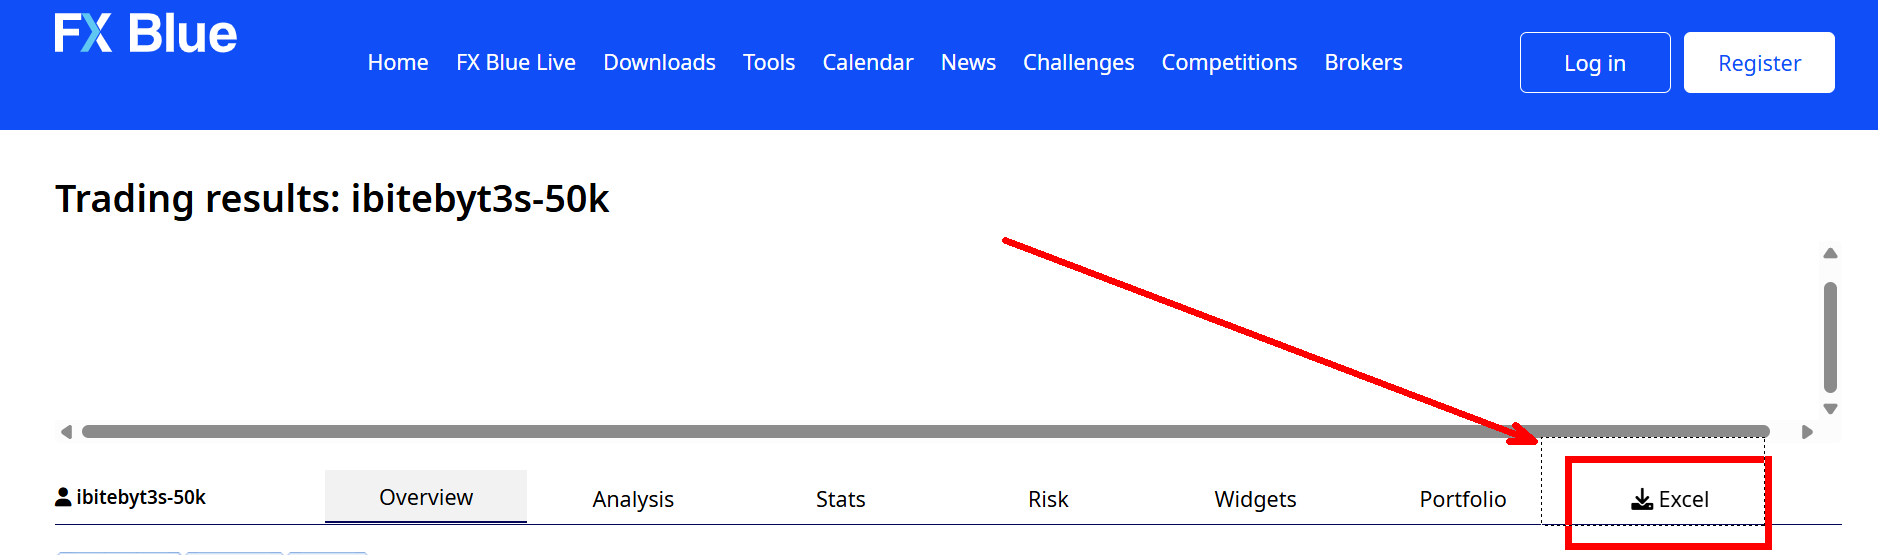
  2. Download your trading data from FxBlue:

    • Go to the FxBlue webpage of the account you want to analyze. For example, the Aggressive Portfolio: ibitebyt3s-10k-50r or any of the portfolios of my Track Record page.
    • On the page, click Excel to download the CSV file. This will give you a file like orders-ibitebyt3s-10k-50r.csv.

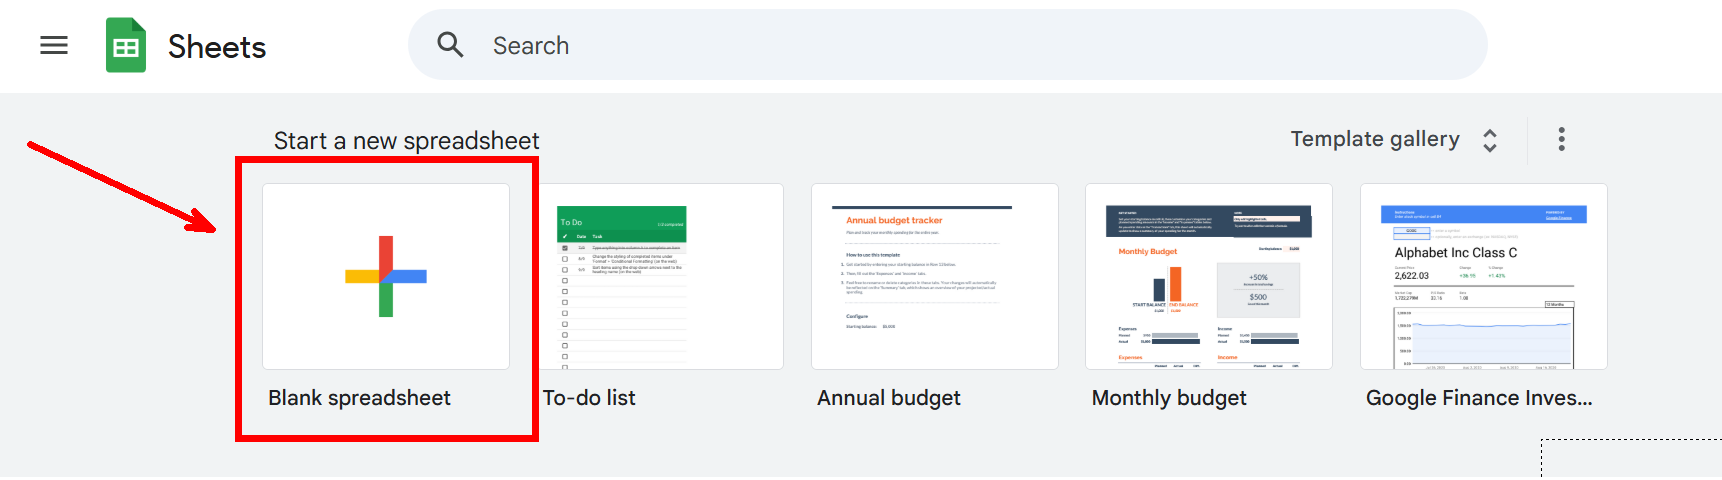
Step 2. Load the Spreadsheet

  1. Go to Google Sheets.
  2. Create a new blank spreadsheet.
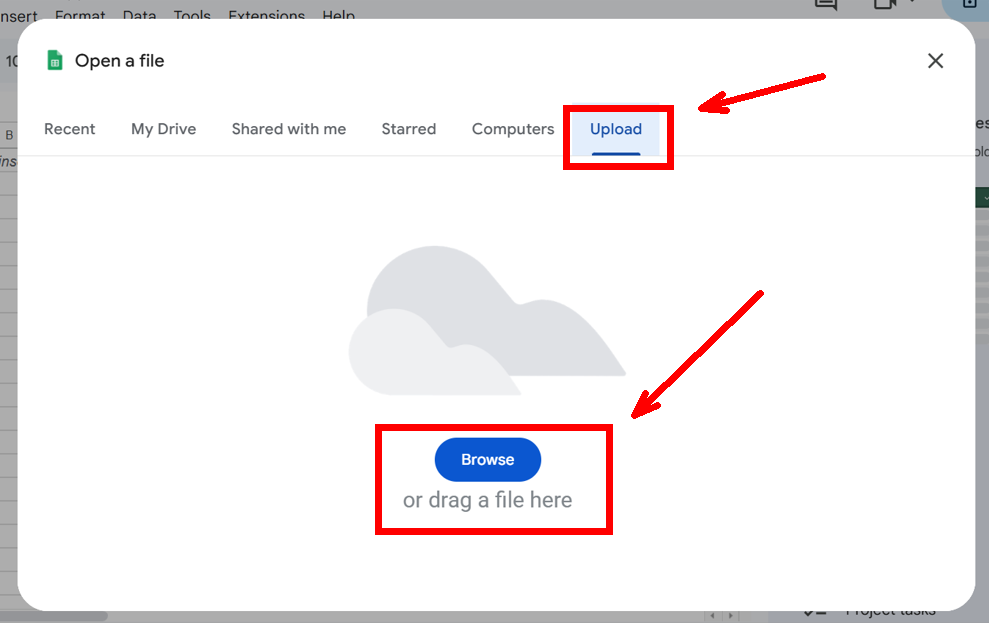
  3. Select File > Open > Upload > Browse, then upload the Fx Blue - Data Analyzer - English.xlsx file.
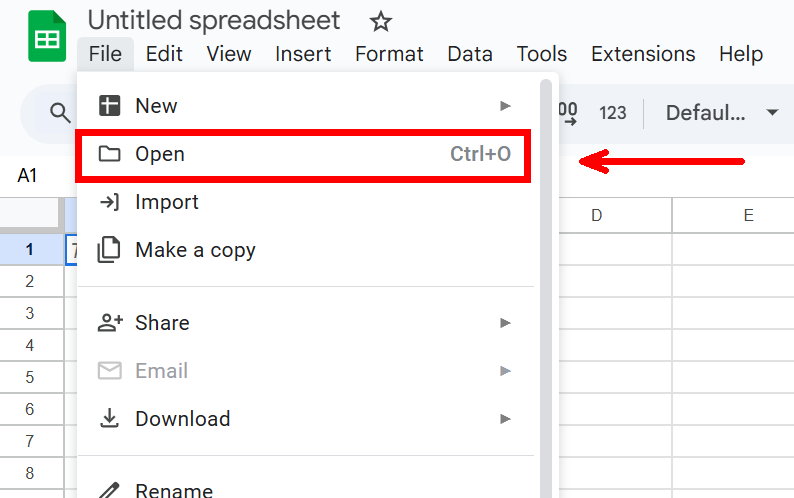
  4. Once loaded, you’re ready to import your trading data.

Step 3. Import Your CSV Data

  1. Switch to the CSV_data tab.
  1. Go to File > Import > Upload > Browse, then select your downloaded .csv file.
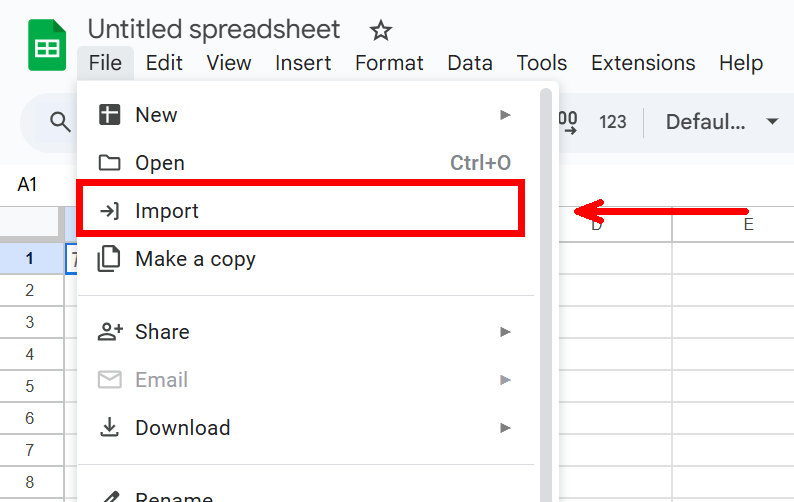
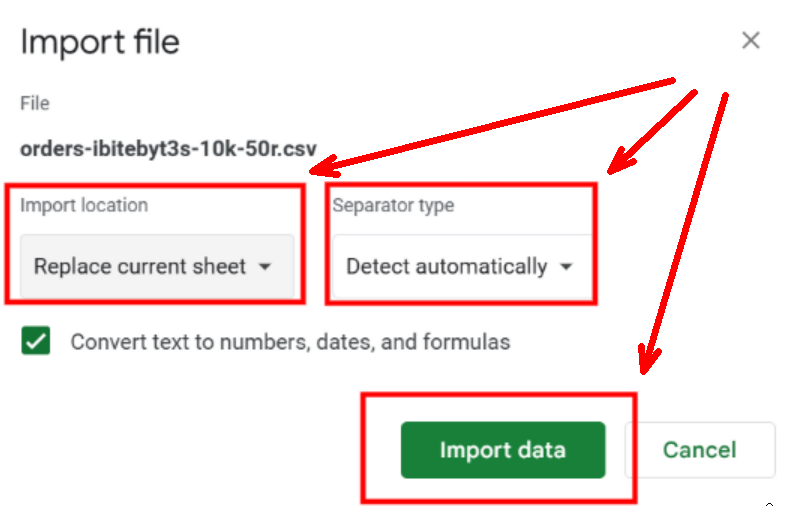
  2. Set Import location to Replace current spreadsheet.
  3. Set Separator type to Detect automatically.
  4. Click Import data.

Step 4. Configure Account & Symbol Info

  1. Switch to the Account_and_Market_Info tab.
  2. Enter your account’s leverage in the top-left cell.
  3. Update symbol information if needed:
    • Table 1: Enter each symbol (e.g., XAUUSD) and its contract size. (In MetaTrader, you can find this info here).
    • Table 2: Enter conversion rates if your instruments are quoted in non-USD currencies.
    • ⚠️ NOTE: The spreadsheet assumes fixed conversion rates, even though real rates fluctuate.

Step 5. Data Analysis

Data_Table

Finally, switch to Data_Table tab to Adjust formulas in the Account Balance and Cumulative Profit columns to cover your full dataset.

This sheet organizes your trading history into clear sections:

  • Identifiers:
    • Type – The kind of record (e.g., deposit, withdrawal, or closed trade).
    • Ticket – A unique ID number assigned to each trade.
    • Symbol – The instrument being traded (e.g., XAUUSD, EURUSD).
    • Direction – Whether the trade was a Buy or Sell.
    • Result: - Tells if the trade was a winner or a loser.
  • Risk & Margin:
    • Lots – The Lots to Trade of the operation, or in other words, the lots that were traded.
    • Risk – The dollar amount accepted to lose based on the stop loss.
    • Margin – The capital required to open and hold the trade.
  • Profit & Costs:
    • Profit – The gross gain or loss from the trade.
    • Swap – Interest or rollover fee charged/earned for holding a trade overnight.
    • Commission – Broker fee charged for executing the trade.
    • Net Profit – Profit after subtracting swap and commissions.
    • Account Balance – Total money in the account after the trade closes.
    • Cumulative Profit – Running total of profits and losses across all trades.
  • Trade Details:
    • Open Price – The entry price when the trade was opened.
    • Close Price – The exit price when the trade was closed.
    • Take Profit Price – The target price set to automatically close a trade in profit.
    • Stop Loss Price – The price set to automatically close a trade to limit loss.
    • Open Time – The exact date and time the trade was opened.
    • Close Time – The exact date and time the trade was closed.
    • Pips – The number of price units gained or lost in the trade.
    • Trade Duration in Hours – How long the trade was open, measured in hours.

Columns such as Risk, Margin, Account Balance, and Cumulative Profit are automatically calculated. Deposits and withdrawals are shown but grayed out. Open trades are ignored.

⚠️ NOTE: All timestamps are in the broker’s server time (often UTC+2 or UTC+3).

Analysis

The Analysis tab summarizes account performance with key stats:

  • Total # of Trades – Total trades executed.
  • Total # of Wins – Number of profitable trades.
  • Total # of Losses – Number of losing trades.
  • Win Rate % – Percentage of profitable trades.
  • Account Balance – Current balance after all trades.
  • Cumulative Profit – Net profit/loss across all trades.

It also includes charts for Risk, Account Balance, and Cumulative Profit trends.


Final Thoughts

By combining FxBlue’s raw trade data with a structured spreadsheet, you can independently verify the true risk and margin of each trade—not just rely on reported results. This approach is especially useful when analyzing third-party strategies or monitoring automated systems, since it reveals how closely execution aligns with intended money management rules.

How to Calculate Risk & Margin

Hello,

In this post, I’ll show you how to calculate Risk and Margin—two of the most important concepts in trading. Risk tells you how much money you could potentially lose on a trade, while Margin tells you how much capital your broker requires to open that trade. I’ll also explain how Leverage influences Margin and why it’s crucial to understand its effects.

If you’d like to go further, check out my next post where I explain how to monitor Risk across using data published to a FxBlue track record page.

Basic Definitions

  1. Lots (Contracts): The standard unit used to measure how much of an asset you are trading. Brokers don’t ask how much money you want to risk; instead, they ask how many lots you want to trade. You then calculate your Risk and required Margin to determine the appropriate number of lots. The minimum tradable lot in CFDs is usually 0.01, though it may vary depending on the broker and asset.
  2. Lots to Trade (Position Size): The number of contracts used in a trade, based on your risk and account size.
  3. Lot Size (Contract Size): The amount of the underlying asset represented by 1 lot. This value is defined by the broker. Examples:
    • 1 lot of XAUUSD: 100 ounces of Gold
    • 1 lot of USDMXN: 100,000 USD
    • 1 lot of GBPJPY: 100,000 GBP
  4. Entry Price: The price at which you open a trade.
  5. Stoploss Price: The price at which the trade will automatically close to limit losses.
  6. Risk: The amount of money you are willing to lose if the trade reaches your Stop Loss. This is determined before entering the trade and is essential for controlling losses.
  7. Margin: The money you must have in your account to open a trade. It depends on your lots to trade, lot size, entry price, and leverage.
  8. Leverage: A tool that lets you control a larger position with a smaller amount of capital. While it amplifies potential profits, it equally magnifies potential losses.
  9. Conversion Rate: The exchange rate used to convert the value of a trade or its risk from the quote currency into your account currency. This is necessary when your account currency differs from the trade’s quote currency. In real-world scenarios, this number fluctuates in real time, but for simplicity, we will assume it is fixed in the examples in this post.

Risk & Margin

When opening a trade, it’s good practice to first calculate the Risk and then check whether you can afford that position by calculating the Margin.

To make this clear, I’ll first explain the concepts and then walk you through some examples.

Risk

With this formula, we determine how many lots should be used in a trade to match our desired monetary risk. In other words, we are calculating the Lots to Trade that align with the chosen Risk.

$$
Lots\ to\ Trade=\ \frac{Risk\ ($)\ \times\ Conversion\ Rate} {|\ (Entry\ Price\ -\ Stoploss\ Price)\ |\ \times\ Lot\ Size }
$$

Margin

Once we have calculated the Lots to Trade, we can then check whether our account has enough funds to cover the Margin required to open the trade.

$$
Margin\ ($)\ =\ \frac{Lot\ to\ Trade\ \times\ Lot\ Size\ \times\ Entry\ Price} {Leverage\ \times\ Conversion\ Rate}
$$

Example 1: XAUUSD (Gold)

Let’s say we want to buy Gold while it’s currently at $1,000 and set a stoploss at $900. We want to risk $500 of our account. Our account is using 1:1 leverage.

  • Entry Price: $1,000
  • Stoploss Price: $900
  • Risk: $500
  • Conversion Rate: $1
  • Lot Size: 100 ounces
  • Leverage: 1

Risk

Step 1: Substitute the values into the Risk Formula

$$
Lots\ to\ Trade=\ \frac{$500\ \times\ $1} {|\ ($1,000 -\ $900)\ |\ \times\ 100 }
$$

Step 2: Solve the Parenthesis

$$
Lots\ to\ Trade=\ \frac{$500} {$100 \times 100 }
$$

Step 3: Solve the Division

$$
Lots\ to\ Trade=\ \frac{$500} {$10,000 }
$$

Step 4: Final Result

$$
Lots\ to\ Trade= 0.05
$$

This means we need to open 0.05 lots (5 ounces of Gold) to risk $500 with a stoploss at $900.


Margin

  • Lots to Trade: 0.05

Step 1: Substitute the values into the Margin Formula

$$
Margin\ ($)\ =\ \frac{0.05 \times 100 \times $1,000} {1 \times $1}
$$

Step 2: Solve the Multiplications

$$
Margin\ ($)\ =\ \frac{$5,000}{$1}
$$

Step 3: Solve the Division – Final Result

$$
Margin\ ($)\ =\ $5,000
$$

So, the required margin for this trade is $5,000.

With 1:1 leverage, you need the full $5,000 to open the trade. With 1:100 leverage, the margin would only be $50, demonstrating how leverage reduces margin requirements without changing the actual risk.


Example 2: USDMXN

Let’s say we want to buy USDMXN while it’s currently at 18.50 and set a stoploss at 18.00. We want to risk $500 of our account. The account is denominated in USD, so we must include the conversion rate. Leverage is 1:100.

  • Entry Price: 18.50
  • Stoploss Price: 18.00
  • Risk: $500
  • Conversion Rate: 18.50
  • Lot Size: 100,000 USD
  • Leverage: 100

Risk

Step 1: Substitute the values into the Risk Formula

$$
Lots\ to\ Trade = \frac{500 \times 18.50}{|(18.50 - 18.00)| \times 100,000}
$$

Step 2: Solve the Parenthesis

$$
Lots\ to\ Trade = \frac{500 \times 18.50}{0.50 \times 100,000}
$$

Step 3: Multiply and Simplify

$$
Lots\ to\ Trade = \frac{9,250}{50,000}
$$

Step 4: Formula Result

$$
Lots\ to\ Trade = 0.185
$$

Step 5: Truncate to Two Decimals

$$
Lots\ to\ Trade = 0.18
$$

This means we need to open 0.18 lots (equivalent to controlling $18,000 worth of MXN) to risk slightly less than $500 with a stoploss at 18.00.


Margin

  • Lots to Trade: 0.18

Step 1: Substitute the values into the Margin Formula

$$
Margin\ ($)\ =\ \frac{0.18 \times 100,000 \times 18.50}{100 \times 18.50}
$$

Step 2: Solve the Multiplications

$$
Margin\ ($)\ =\ \frac{333,000}{1,850}
$$

Step 3: Solve the Division – Final Result

$$
Margin\ ($)\ =\ 180
$$

So, the required margin for this trade is $180.


Example 3: GBPJPY

Let’s say we want to sell GBPJPY while it’s currently at 198.758 and set a stoploss at 199.848. We want to risk $500 of our account. The account is denominated in USD, so we include the conversion rate (JPY → USD = 150). Leverage is 1:100.

  • Entry Price: 198.758
  • Stoploss Price: 199.848
  • Risk: $500
  • Conversion Rate: 150
  • Lot Size: 100,000 GBP
  • Leverage: 100

Risk

Step 1: Substitute the values into the Risk Formula

$$
Lots\ to\ Trade = \frac{500 \times 150}{|(198.758 - 199.848)| \times 100,000}
$$

Step 2: Solve the Parenthesis

$$
Lots\ to\ Trade = \frac{500 \times 150}{1.09 \times 100,000}
$$

Step 3: Multiply and Simplify

$$
Lots\ to\ Trade = \frac{75,000}{109,000}
$$

Step 4: Formula Result

$$
Lots\ to\ Trade \approx 0.688
$$

Step 5: Truncate to Two Decimals

$$
Lots\ to\ Trade = 0.68
$$

This means we need to open 0.68 lots (controlling 68,000 GBP worth of JPY) to risk slightly less than $500 with a stoploss at 199.848.


Margin

  • Lots to Trade: 0.68

Step 1: Substitute the values into the Margin Formula

$$
Margin\ ($) = \frac{0.68 \times 100,000 \times 198.758}{100 \times 150}
$$

Step 2: Solve the Multiplications

$$
Margin\ ($) = \frac{13,509,144}{15,000}
$$

Step 3: Solve the Division – Final Result

$$
Margin\ ($) \approx 901
$$

So, the required margin for this trade is $901.

Final Thoughts & Key Takeaways

  1. Risk comes first: Always calculate how much money you are willing to lose before considering potential profits. Position sizing through the risk formula helps you avoid blowing up your account.
  2. Margin ≠ Risk: Margin is only the entry ticket to open a trade. Your real risk is defined by your stoploss and the position size you choose.
  3. Leverage is a double-edged sword: While higher leverage reduces the margin required, it does NOT reduce potential losses. Use leverage wisely, as it can tempt you to open larger positions than they should.
  4. Conversion rates matter: When trading assets quoted in a different currency than your account, the conversion rate affects both your risk and margin. Fluctuations can shift your actual exposure.
  5. Stoploss placement is crucial: The farther your stoploss, the smaller the position size must be to maintain the same risk. A tighter stoploss allows for a larger position size.
  6. Check margin availability: Even if your risk and position size are correct, insufficient margin will prevent execution. Always leave a safety buffer.
  7. Beware of margin calls: If your account balance falls below the margin requirement, the broker may automatically close your positions.
  8. Trading is not fast money: Even with careful calculations, profits are gradual and require discipline. The goal is to survive long enough in the market for your edge to play out.

If you’d like to continue, the next post shows how to monitor Risk directly from an FxBlue track record page.

Prettify Burp "Copy as curl" commands with sed and vim

Burp Suite is my go to tool whenever I want to fiddle around with web requests. It’s very useful for simple requests but sometimes things might get a bit more complicated when I need to interact with the data received or forward it to the next request. Maybe I need to calculate the hash for a challange in a CTF, or it could also be that I want more control of the concurrency between requests or for some reason I need to do things in a programmatic way. I’m aware of Burp Macros but I’m not a big fan of them.

I’ve seen that a lot of people like to script in python but my preferred language is bash and its popular command to make web requests is curl. Fortunately translating raw HTTP requests to curl is a feature found by right clicking said request either in Chrome, Firefox or Burp Suite. Unfortunately, the default output of Firefox and Burp Suite isn’t in the most “workable format”.

My ideal “workable” format is to have headers separated by newlines and surrounded by double quotes instead of single quotes. The advantage of using double quotes is that variables can be present within the string. Let’s compare some curl command generators.

Chrome has a nice output to work with along a convenient --compressed flag:

1
2
3
4
5
6
# Chrome
curl 'https://public-firing-range.appspot.com/' \
-H 'authority: public-firing-range.appspot.com' \
-H 'accept: text/html,application/xhtml+xml,application/xml;q=0.9,image/avif,image/webp,image/apng,*/*;q=0.8,application/signed-exchange;v=b3;q=0.9' \
-H 'Other: headers'
--compressed

Firefox stays a step behind by joining all headers into a single line:

1
curl 'https://public-firing-range.appspot.com/' -H 'Accept: text/html,application/xhtml+xml,application/xml;q=0.9,image/avif,image/webp,*/*;q=0.8' -H 'Accept-Language: en,en-US;q=0.8,es-MX;  q=0.5,es;q=0.3' -H 'Other: headers'

Lastly, Burp Suite on top of joining all headers in a single line it also surrounds them between single quotes with a prefixed dollar sign $'':

1
2
3
curl -i -s -k -X $'GET' \
-H $'Host: public-firing-range.appspot.com' -H $'Accept: text/html,application/xhtml+xml,application/xml;q=0.9,image/avif,image/webp,*/*;q=0.8' -H $'Other: headers' \
$'https://public-firing-range.appspot.com/'

As you can see, translating some of these generated commands into something usable in a script by hand would be very time consuming. One could just write what is needed by hand without using any generated curl command but I ended up liking a lot more to start with requests that were already built by the browser.

Setup

How does it works?

Given the situation with the generated curl commands and the fact that I will be using such features on a daily basis I found a way to satisfy my needs. The full solution requires vim but if you want to know how the sed part works stick to this chapter. It’s also worth to say that this solution was originally created to fix only the burp generated command, then I found out that it also works in the Firefox curl command as a charm but not with the chrome curl command.

Each line in this list corresponds to a line in the sed command respectively:

  1. Separate each header with a new line and add padding.
  2. Add a backslash to indicate line continuation (necessary for the bash syntax parser).
  3. Replace the single quotes and dollar sign surrounding the strings with double quotes.
  4. Delete empty lines (can be improved).
  5. Add a space between the -H option and the double quote.
1
2
3
4
5
6
7
8
9
10
#! /bin/bash
# burp_curl.sh

sed \
-e 's/\-H /\n \-H/g' \
-e 's/ \n/ \\\n/g' \
-e 's/\(\$'\''\|'\''\)/"/g' \
-e 's/ \\\n//g' \
-e 's/ -H"/ -H "/g'

Save this as an executable file reachable by the $PATH variable. I saved it as burp_curl.sh

curl + sed + vim

To have vim integration, add these lines to your .vimrc file.

1
2
3
" prettify curl commands
nmap <Leader>bc :%! burp_curl.sh <CR>
vmap <Leader>bc :%! burp_curl.sh <CR>

Now every time I hit Spacebar + b + c the curl command I just pasted to my buffer will be prettified. Note that this also works only in the currently selected lines (visual mode) so you’ll not have to worry about it messing up with other parts of your script.

If you did things right you should be able to prettify any curl command from burp or firefox as in the following gifs:

Visual Mode:

Normal Mode:

Note

It’s worth saying that when dealing with multipart/form-data content type you’ll definitely want to use the -F option instead of using the generated commands or curl might not catch the response. I

Finally, if the output of the request is readable in burp but you see gibberish with the curl command or no output at all, delete the Accept-Encoding: gzip, deflate header.